Recording Vinyl With SoundForge: Difference between revisions
Jump to navigation
Jump to search
No edit summary |
No edit summary |
||
| Line 34: | Line 34: | ||
* <strike>To monitor the audio while recording, connect the stereo RCA to a second device and monitor through that.</strike> | * <strike>To monitor the audio while recording, connect the stereo RCA to a second device and monitor through that.</strike> | ||
==== Recording audio | ==== Recording audio ==== | ||
* '''menu bar''' > '''Record''' button | * '''menu bar''' > '''Record''' button | ||
| Line 43: | Line 43: | ||
==== Saving audio ==== | ==== Saving audio ==== | ||
* With the whole vinyl recording loaded into Sound Forge, zoom into in and out points. | |||
* Drop markers with the <kbd>M</kbd> keyboard shortcut. | |||
* Select both channels from in point to out point, then copy. | |||
* Create a new window. | |||
* Paste. | |||
* Save. | |||
** '''Format''': FLAC | |||
* After saving all the individual tracks, save the project. | |||
** With the window containing the entire recording with in and out markers, '''Save As''' and select the native Sound Forge project format. | |||
== Converting FLAC to mp3 == | |||
* '''AVS Audio Converter''' | |||
* Drag the `.flac` files into the files pane. | |||
* Settings | |||
** '''Codec''': mp3 | |||
** '''Channels''': stereo | |||
** '''Bitrate''': 192kps | |||
** '''Sample Rate''': 44100 Hz | |||
** '''Sample Size''': 16 bit | |||
Revision as of 05:49, 26 August 2014
Connect the turntable to the computer
- Clean the vinyl.
- Connect the turntable to the computer using a USB cable.
System settings for USB recording (Windows 7)
- Start Menu > Control Panel > Hardware and Sound > Sound
- Recording tab
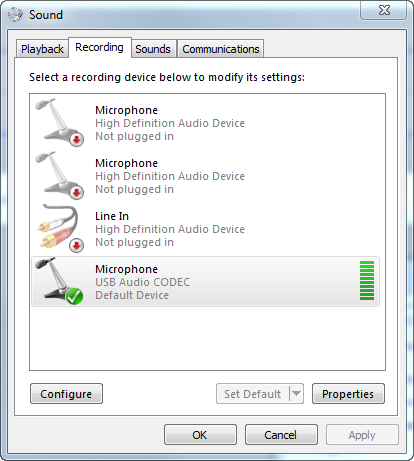
- With Microphone selected as the recording device, click the Properties button
- Advanced tab:
- Select Microphone: USB Audio CODEC
- With USB Audio CODEC selected, click Properties
- Default format: 2 channel, 16 bit, 44100 Hz
- Levels tab:
- Tweak levels until the audio isn’t peaking
- N.B. The last time I did this (with the Reveen record) I had to turn recording levels all the way down to 3 before the audio wasn't peaking in Sound Forge.
- Listen tab:
- Listen to this device: checked
- Playback through this device: Default playback device
- Advanced tab:
- Recording tab
- Start Menu > Control Panel > Hardware and Sound > Sound > Playback tab
- Set “Speakers: High Definition Audio Device” as the default.

Recording software
Sound Forge 10.0
Settings/Preferences
- Options > Preferences > Audio tab
- Audio device type: Windows Classic Wave Driver
- If there’s an option, make sure the USB microphone is used as the recording device.
When recording through USB it’s not possible to monitor the sound being recorded through the computer.To monitor the audio while recording, connect the stereo RCA to a second device and monitor through that.
Recording audio
- menu bar > Record button
- Queue the record.
- Click the record button next to "Arm"
- Drop the stylus and play the record.
- Click Stop on the transom when finished.
Saving audio
- With the whole vinyl recording loaded into Sound Forge, zoom into in and out points.
- Drop markers with the M keyboard shortcut.
- Select both channels from in point to out point, then copy.
- Create a new window.
- Paste.
- Save.
- Format: FLAC
- After saving all the individual tracks, save the project.
- With the window containing the entire recording with in and out markers, Save As and select the native Sound Forge project format.
Converting FLAC to mp3
- AVS Audio Converter
- Drag the
.flacfiles into the files pane. - Settings
- Codec: mp3
- Channels: stereo
- Bitrate: 192kps
- Sample Rate: 44100 Hz
- Sample Size: 16 bit