Document what content cues influence how the form fields are added to the document.
For example, text followed by a straight line will cause a textbox to be added to the form.
An rectangular outline will cause a multi-line textbox to be added, but a blank area will be passed over.
Textbox options
Multi-line (textarea)
with field selected > Properties (Ctrl+I) > Options tag > Multi-line: checked
Comb
The Comb setting splits the textbox into evenly spaced boxes, allowing only one character to be entered in each box.
with field selected > Properties (Ctrl+I) > Options tag
Deselect all other options (otherwise Comb won't be available).
Comb of number of characters to allow in the textbox.
Checkbox groups
It doesn't appear possible to group checkbox form fields together. If they have the same Name they will be have like radio buttons, i.e. only one option out of all options with the same name can be selected at one time.
Radio buttons
To create a group of radio buttons give the radio buttons the same Name, with unique Export Values.
Note that radio buttons can be round or square (the appearance of checkboxes) but it's the Name value that determines if they act like radio buttons, i.e. only one option in a group can be selected at a time.
Tools pane > Forms > Edit Fields > Fields > select a field
right click > Properties (Ctrl+I)
field name: General tab > Name Note that form fields that share a Name will all have the same Tooltip value, i.e. when the tooltip value is changed for one of the options, it will update the tooltip value for all the other options.
export value: Options tab > Export Value
Both the Tooltip and Export Value are read out for checkboxes in a group. Best to make the tooltip as concise as possible if it will be read out multiple times.
Form field tab order
Form field tab order must match the flow of the document: left to right, then top to bottom, with the exception of columns where it makes more sense to go from the top to the bottom of the leftmost column, then return to the top of the next column to the right.
Tools pane > Forms > Edit > Fields tab
Drag form fields to the appropriate place in the list.
Note that changing the position of a field in the list will remove its tag from from the tags tree. After a field's tab position is changed, re-tag it with tags pane > options menu > Find.... See [#tagging]
Form field alternate text
Each form field must have alternate text that accurately describes the data to be collected by the field.
Tools pane > Forms > Edit
Form fields can be selected either in the document content area, or under the Fields tab.
With a field selected: right click > Properties (Ctrl+i)
Name is the label of the field. If a tooltip value is provided, this can be a code containing abbreviations, underscores and/or numbers that wouldn't necessarily make sense if it were read out loud. The Name field can contain spaces and special characters.
Tooltip, if provided, is the text that is read out loud for the form field. As such the tooltip value should be easily understood. If a tooltip value is not provided, a screen reader would typically fall back on the Name value.
Tagging form fields
Form fields must be represented by tagged annotations in the tags tree
tagged annotation
tags pane > options menu > Find...
Find: Unmarked Annotations
Search Page or Search Document
For each unmarked annotation that is located, click the Tag Element button.
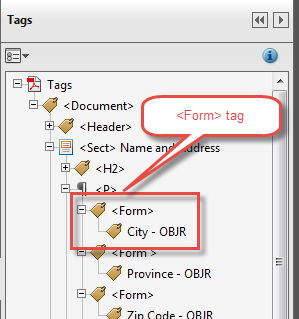
Form field nodes must be enclosed in `<Form> tags
<Form> tags
Select a sibling node for the <Form> tag.
tags pane > options menu > New Tag
Type: Form
Drag the tagged annotation into the new <Form>` tag.