PowerPoint Accessibility Best Practices
Overview
Best practices for making PowerPoint (.ppt) files ADA compliant.
Always keep in mind Adobe's advice:
Whenever possible, accessibility should be incorporated directly into the document using the application that created it. When accessibility is incorporated directly into the source document, less repair work will be required in Adobe Acrobat. This is very important when the PDF must be regenerated based on changes in the source file. If changes are only made in the PDF and not in the source file, accessibility work will need to be done each time the document is updated.
Resources
- Creating Accessible PowerPoint Presentations (Office.com)
- Creating Accessible Presentations by Glenna Shaw (Office.com)
- The PowerPoint help pages are vague and unhelpful, along the lines of “making a PowerPoint document accessible is the best way of making a accessible PowerPoint document”.
- Some universities, non-profits, and government agencies have pages detailing their own best practices for PowerPoint accessibility.
- Creating Accessible Documents with Microsoft PowerPoint 2010 (US Dept of Veterans Affairs)
PowerPoint's built-in accessibility checker
PowerPoint provides an Accessibility Checker when the presentation is saved in version PowerPoint 2013 or greater. (File > Save As… > Save As Type: PowerPoint Presentation (*.pptx))
File > Info > Inspect Presentation > Check for Issues > Check Accessibility
The Accessibility Checker pane will be displayed next to the presentation with a list of Errors, Warnings, and Tips.
Reading order
Reading order as applied to PowerPoint presentations can be interpreted differently by different screen readers, i.e. there is no ultimate control over how it comes out.
Some things that influence reading order:
- If a slide does not contain any custom elements, it won’t show up under Check Reading Order. Taking this into consideration in the design phase will save the compliance operator this task while making the document compliant.
- Slide placeholder text boxes. PowerPoint recommends slide templates over adding text directly into a slide. This way the text will be visible in the Outline View and reading order can be confirmed there.
- It appears that the slide title will always be read out first, regardless of where that text is placed within the Selection Pane stack.
- Order in which elements are added to a slide. By default the elements added first are also read first. (They are also the furthest back in front-to-back reading order (have the lowest z-index) which also corresponds to reading order.)
- Z-index. Safest assumption is that a screen reader will read elements furthest back first, and then read elements in ascending order towards the front. (E.g. if one element is layered on top of another, the element underneath is read first followed by the element on top.)
- Tab order. With no elements selected the Tab key can be used to select successive elements on a slide. This Tab order corresponds to reading order. Tab order of slide elements should correspond with their Z-index arrangement.
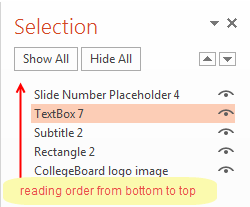
- Order within the Selection pane.
- Home tab > Arrange > Selection Pane
- All of the elements in a slide will be displayed in the Selection Pane. The elements at the bottom of the list are read off first.
- The order within the Selection Pane corresponds to Z-index.
- The arrangement of elements on the slide can have an influence on screen readers also if the screen reader attempts to read the elements from left to right and from top to bottom.
Basic reading order confirmation
- Slides that use a custom layout that deviates from the slide template placeholders will appear under Check Reading Order. The fact that they appear under Check Reading Order doesn’t necessarily mean that their reading order is incorrect; just that they require manual review. There is no way of marking a slide’s reading order as having been “confirmed”.
- Arrange the elements appropriately in the Selection Pane, keeping in mind that the screen reader will read from the bottom of the stack to the top.
- Navigate to a slide.
- Home tab > Select > Select All
- Drawing Tools: Format tab > Arrange > Selection Pane
- Export a PDF and confirm reading order in the PDF.
N.B. The PDF is for confirmation purposes only. It is not a file that should be distributed to the client as a compliant end-product document.- View > Read Out Loud > Activate Read Out Loud
- View > Read Out Loud > Read This Page Only -or- Read To End Of Document
- Tags Panel > navigate to the slide > expand the slide’s node > visually confirm order of tags within the slide
- Export as RTF and confirm reading order in the RTF.
- Export as PDF
- Open the PDF in Adobe Acrobat.
- Save As… and select .rtf as the format.
- Open the .rtf document (in Windows, the default program is MS Word).
- Read the document out loud using the Speak function.

Document properties/meta data
File > Info > Properties > Show Document Panel
- Title
N.B. The document language cannot be set like it can in Adobe Acrobat.
Alternate text
All images and charts must have alternate text.
Select the image > right click > Format Picture > Format Picture Pane > Size & Properties tab > Alt Text > enter alternate text in the Description field
Artifacts
If an image should be ignored by a screen reader (e.g. decorative photos, logos, etc.) it should be marked as an “Artifact”. PowerPoint doesn’t provide a means to do this however.
Any image without alternate text will show as an Error up in PowerPoint’s accessibility checker.
In order to avoid this, enter a punctuation mark such as a dash character as the alternate text. This will not be read out by a screen reader, but it will not show up as an error in PowerPoint's accessibility report like empty alternate text or a space character would.
Best practice on the design level
Place objects that are purely decorative in PowerPoint templates. They will then be correctly identified as artifacts.[1]
Assigning alternate text to complex objects
All the elements in a chart or figure should be grouped together, with alternate text applied to the group.
- Select the objects that make up the chart in either the Selection Pane or directly in the Slide.
- Drawing Tools > Format > Group > Group
- Select the group object > right click > Format Shape > Size & Properties tab > Alt Text > Description
N.B. There is no built-in way to confirm how TTS will handle a group with alternate text assigned to it. The desired behavior is that the alternate text would be read out, and any text within the group is ignored.
There is a “Speak” command in PowerPoint, but this will only speak selected text. It is disabled when a Group object is selected.
Group alternate text does not export when saving a PowerPoint presentation as a PDF
The alternate text is assigned to the group in Adobe Acrobat after the PowerPoint presentation has been converted to PDF format.
Tags Panel > expand the tree to find the Group Node in the slide > right click > Properties > Tag tab > Alternate Text
Slides
Slide titles
Each slide must have a title.
To resolve this issue: View > Outline View > left column > Enter slide title text next to the slide number
N.B. The text entered into the outline view will appear along with the slide content. If this isn’t desirable one work-around would be to make the text transparent.
With the slide title text selected: right click > Format Shape > Text Options > Text Fill > No Fill or Transparency: 100%.
Unique Slide Titles
Slides must have unique titles. This is an issue that can only be resolved by revising content.
Meaningful Link Text
Ideally, link text is a description and not an URL.
If a URL is all that is provided, descriptive text can be assigned to the link using ScreenTips.
- Insert tab > Links group > Hyperlink > ScreenTip… > ScreenTip text box
Exporting Notes
Slides can have speaker's notes attached to them. These can be exported with a PDF or ignored during the export.
This option is controlled during the export process.
- File > Export > Create Adobe PDF
- “Save Adobe PDF File AS” dialog > Options button
- Convert Speaker Notes (checked or unchecked)
Notes
- ↑ Adding Alternative Text in MS PowerPoint (CommonLook by NetCentric Technologies)