Making Rollover Image States in Photoshop
Jump to navigation
Jump to search
Overview[edit]
Workflow for creating different buttons states and exporting them as web-friendly images.
Workflow[edit]
[edit]
- Each button should be on its own layer.
- Once the menu has been created, select all of the buttons layers.
- Then apply "layer-based slicing".
- Layer > New Layer Based Slices
- Do whatever is necessary to design the buttons for their "normal" inactive state.
Preserve the inactive state of the buttons in a layer comp[edit]
- Window > Layer Comps to open the Layer Comps window.
- Click Create New Layer Comp button in the bottom right of the Layer Comps window.

- Set the properties for the layer comp in the dialog.
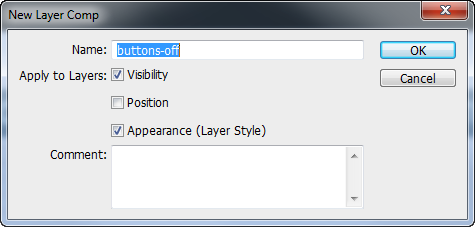
- Name the comp, e.g. "Inactive"
- Choose which properties the layer comp will track.
- Click OK.


Create rollover state for the buttons[edit]
- Change the appearance of the buttons using Layer Styles.
- If the new style changes the bounds of the different objects in the layers, the layer-based slices will adjust to accommodate the changes.
- Create a new Layer Comp to preserve the rollover state appearance.
- Layer Comps panel > New Layer Comp icon
- Set the rollover state properties in the Layer Comp dialog.
- Click OK and now there are two states for the buttons.
Cycling through the different rollover states[edit]
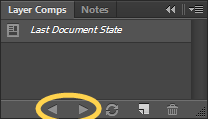
- To cycle through the different rollover states click the right and left arrow icons at the bottom of the Layer Comp panel.

Editing the buttons after layer comps have been created[edit]
- Click the appropriate Layer Comp in the Layer Comps panel. This will load that set of button states.
- Edit the buttons.
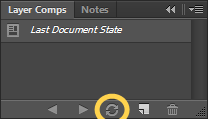
- Layer Comp panel > Update icon to update the Layer Comp with the changes.

See Also[edit]
Photoshop CS5: How to create rollover buttons (lynda.com tutorial on YouTube)